All docs pages
Reading StrikeGEX Levels
StrikeGEX marks the same handful of levels on every tab, using the same colors and the same chips. Learn the vocabulary once here and you can read the HeatMap, the chart, and the wall panels without relearning anything.
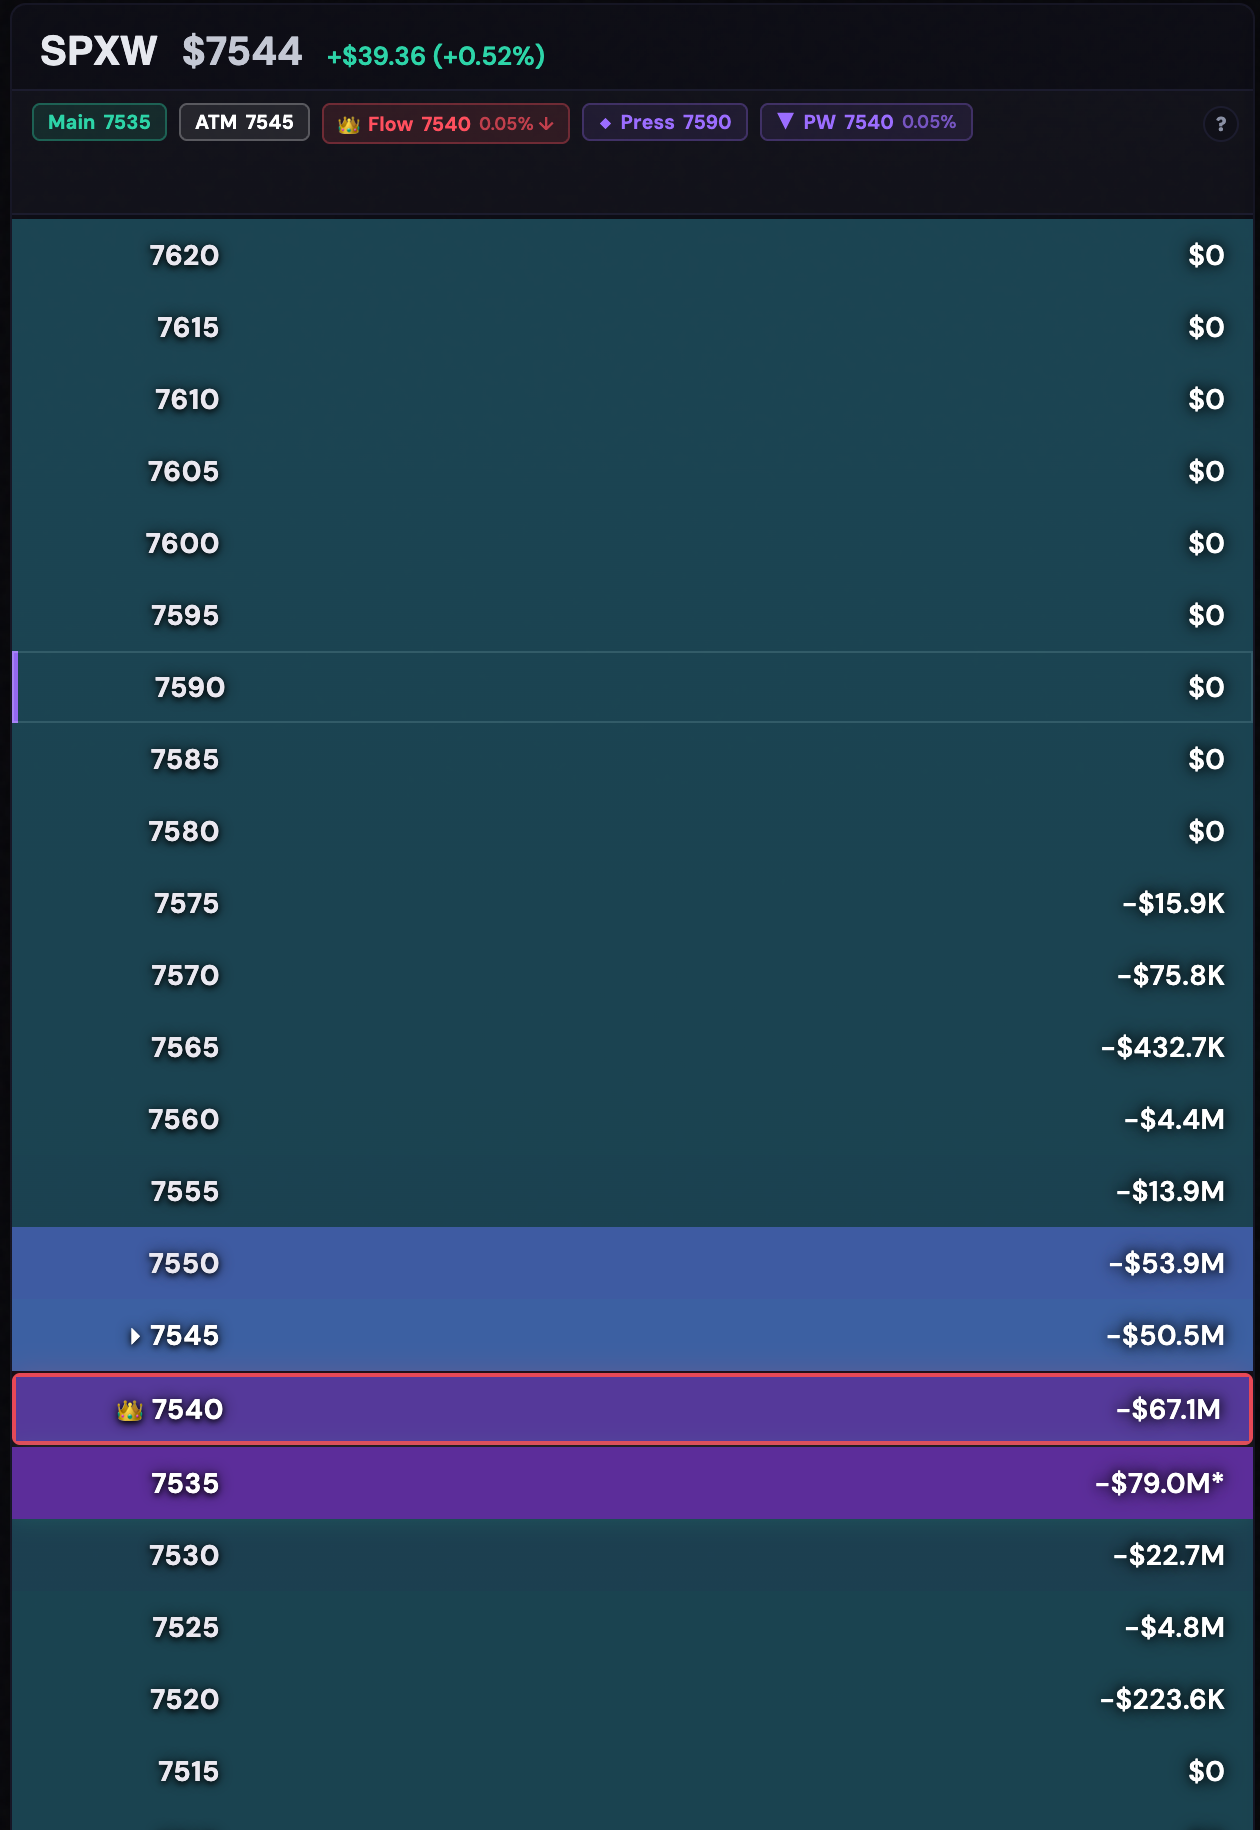
- Yellow = positive gamma (a mean-reverting tape). Purple = negative gamma (a momentum tape).
- Green marks the Main Level; white marks ATM / Active, the strike nearest live price.
- The 👑 Flow chip (the "Flow King") is the strongest level in play — your first reference point.
- Walls cap and support: ▲ GW overhead, ▼ PW below. A ◆ diamond marks a nearby GEX landmark — the Flip (gamma sign change), Sup, or Press.
- The % next to a chip is distance from spot. Bar and value sizes are relative — compare them, don't read units into them.
These readouts describe how dealer hedging tends to shape the tape. They are educational context for your own read, not financial advice.
The colors
Every heat cell is colored by its gamma sign. The ? Color Guide button in the legend expands the same definitions in the app; here is the short version.
- Yellow — positive gamma (a mean-reverting tape). Dealer hedging tends to stabilize price: failed breaks often snap back toward nearby high-gamma rows. Expect compression and tighter ranges.
- Purple — negative gamma (a momentum tape). Dealer hedging tends to amplify moves: breaks can extend, pullbacks stay shallow. Expect expansion and wider swings.
- Green — the Main Level. The green highlight flags the level the model picks as the most tradeable structural level near spot. (In the Color Guide, the green card is titled Neutral / Mixed — the same green also marks a two-way, transitional state.)
- White — ATM / Active. The strike nearest live price. It tracks spot as price moves.
The level chips
Below the map, a row of chips names the levels that matter right now. Each chip has a glyph, a short tag, and a price; the walls and the king also show a distance.
| Chip | What it marks | When to use it |
|---|---|---|
| 👑 Flow | The strongest level in play — the largest nearby flow concentration (the app calls it the Flow King). It can sit above or below price, and the chip shows how far, with an ↑ or ↓. | Your first reference point. Treat it as a magnet or pressure level, not automatically the level you trade at. |
| Main | The Main Level (also the green highlight on the map): the most tradeable structural level near spot. | The level most likely to matter when price is trading right there. |
| ATM | The strike nearest current price. | A reference for where price sits relative to the walls and the king. |
| ▲ GW | Gamma Wall — an overhead concentration that tends to act as resistance, a cap above spot. Shows distance %. | Watch it as a ceiling: a level price often has to work through. |
| ▼ PW | Put Wall — a support shelf below spot. Shows distance %. | Watch it as a floor: a level that tends to absorb selling. |
| ◆ Flip | The level where the gamma regime flips sign — positive on one side, negative on the other. | A boundary between the mean-reverting and momentum sides of the map. |
| ◆ Sup / ◆ Press | Two more diamond landmarks that show on 0DTE symbols: Sup marks a nearby GEX support level, Press a nearby resistance or pressure level. | Secondary floors and ceilings close to spot, filling in between the walls and the flip. |
The crown is labeled differently on other tabs
The crown means the same thing everywhere — the strongest level in play — but the text next to it changes by tab. On the HeatMap the chip reads 👑 Flow (the Color Guide also calls this the Flow King). On the chart the same crown is simply labeled 👑 King.
Same crown, same "strongest level" job — just read the label so you know which view you are looking at. The deeper theory of why these views differ lives in the /learn articles.
Common questions
- Which level should I look at first?
- The 👑 Flow chip (the Flow King). It is the strongest level in play and your anchor; read the color around it, then the walls and flip relative to it.
- What's the difference between the Flow King and the Main Level?
- The king is the strongest concentration nearby and can sit well above or below price. The Main Level is the most tradeable structural level near spot — often the more relevant one when price is trading right at it.
- The number on a wall is smaller than the king's — does that mean it won't hold?
- Not directly. The magnitudes are relative strength, and the % is distance, not force. A wall can still act as support or resistance even when a bigger level sits elsewhere. See Gamma Walls: Why Price Bounces Off Certain Levels.
- Why did the colors flip during the day?
- The gamma regime can change as positioning shifts. When it does, the ◆ Flip moves and cells re-color — yellow zones can turn purple and vice versa. That is the map staying current, updating through the session.