All docs pages
Wall Panels & Momentum
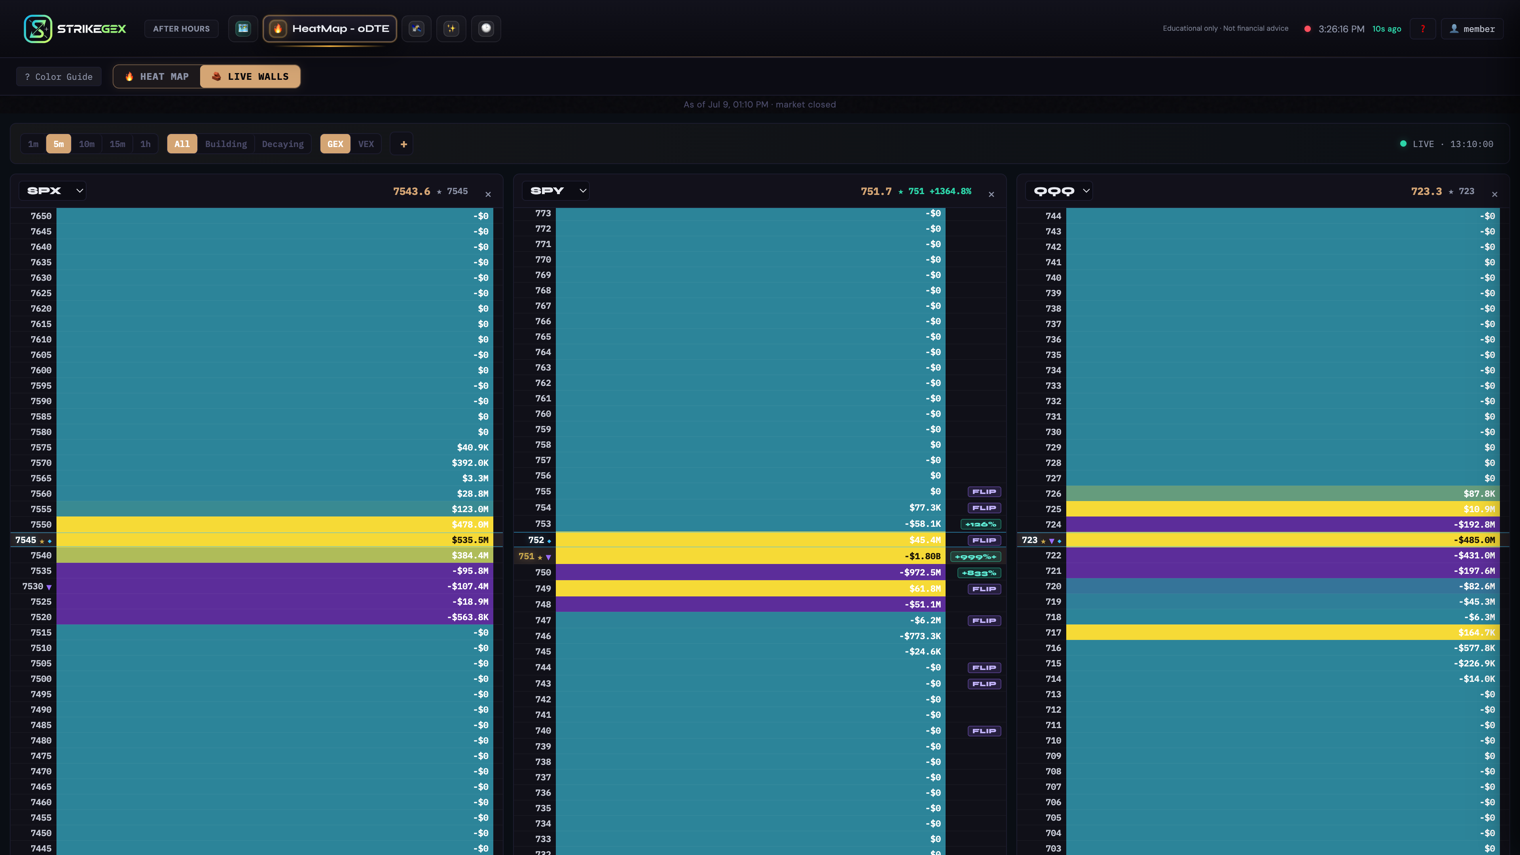
Wall Panels puts up to four 0DTE strike ladders side by side — SPX, SPY, QQQ, and IWM — so you can read cross-index structure at a glance. Each wall carries a live momentum badge that shows how fast gamma is building or decaying at that level. Wall Panels is a Pro feature.
- Up to four panels side by side, one 0DTE (same-day expiry) ladder each: SPX, SPY, QQQ, IWM.
- Each ladder marks the ★ King node, the ▼ negative wall, and the ◆ spot row.
- A momentum badge on each wall shows its percent change over your chosen interval — positive means the wall is strengthening, negative means it is decaying.
- A FLIP badge means the level changed sign — treat the old read as stale.
- A LIVE / STALE chip with a timestamp tells you how fresh the data is.
Everything on this page is educational — a map of where dealer hedging tends to build support, resistance, and magnets across indexes. It is not financial advice or a trade signal. For the theory behind the levels, follow the Learn links at the bottom.
Ladder anatomy
Every panel is a vertical strike ladder centered on the current price. Strike runs down the left; the gamma value runs beside it, colored by concentration (brighter is a stronger level, yellow leans positive, purple leans negative — the same read as the HeatMap). Three markers orient you fast:
- ★ King node — the biggest nearby 0DTE gamma level, the one price tends to gravitate toward. Hover it and the title reads King node (largest nearby 0DTE gamma).
- ▼ Negative wall — the largest negative-gamma wall on the ladder (a level in a momentum-prone, less mean-reverting zone).
- ◆ Spot — the strike nearest the live price, so you always know where the tape sits inside the structure.
At the top of each panel, a King momentum readout pairs the King's strike with its momentum for the selected interval — for example ★ 6950 +2.4% — a one-glance sense of whether the dominant level is firming up or fading.
GEX magnitudes are compact, unitless numbers. Read them relatively — a bigger number, and a brighter row, means a stronger level. Don't attach a dollar unit; compare rows to each other.
Momentum badges
The momentum badge is what Wall Panels adds on top of a plain ladder. Each wall shows a percent-change badge measured over your chosen interval — it tells you how fast gamma is building or decaying at that wall, not just how big the wall is right now.
- A positive badge means the wall grew over the interval — it is strengthening. A +34% badge over 5m means that wall grew by about a third in five minutes.
- A negative badge means the wall shrank over the interval — it is decaying.
- A FLIP badge means the level changed sign since the start of your interval — positive gamma flipped negative, or vice versa. When you see it, the old read on that level is stale; re-read it fresh.
Not every strike gets a badge. Small moves and noise strikes stay blank on purpose, so the badges that do appear mark the levels actually shifting. A very large move is clamped for display (you'll see +999%+ past that point) — read it as "off the charts," not a precise figure.
To find strengthening walls fast, set the Trend filter to Building. Non-matching rows dim rather than disappear, so you keep the full ladder for context while the walls gaining gamma stay bright.
Controls
The toolbar sits above the panels. Each panel also has its own header with a symbol picker and a remove button.
| Control | What it does | When to use it |
|---|---|---|
| Panel symbol select | Per-panel dropdown that switches that panel between SPX, SPY, QQQ, and IWM. | To line up the exact indexes you want to compare in a given panel. |
| × remove / + add | × in a panel header removes it; + in the toolbar adds another panel (up to four). The last panel can't be removed. | To widen out to four indexes, or narrow to just the one or two you're trading. |
| Momentum interval | The window the badges measure over: 1m, 5m, 10m, 15m, or 1h. | Shorter intervals catch fast shifts; longer intervals smooth out the noise and show the session trend. |
| Trend filter | All shows every badge; Building highlights strengthening walls; Decaying highlights weakening ones. Non-matching rows dim, not vanish. | To isolate the walls moving in one direction without losing ladder context. |
| Metric | Toggles the ladder value between GEX (gamma exposure) and VEX (vanna exposure). | GEX for the standard gamma structure; VEX to see how the same strikes respond to volatility. |
Momentum badges track GEX only. Switch the metric to VEX and the ladder values change, but the badges are hidden — the toolbar shows the note momentum = GEX only, and the interval and trend controls dim because they no longer apply. Switch back to GEX to see momentum again.
Status and empty panels
The toolbar's status area tells you whether you're looking at live data. When data is flowing you see a LIVE chip followed by the time it was last updated, for example LIVE · 10:42:17. If the feed goes cold the chip switches to STALE — trust the timestamp over the badges when that happens, and check the Data & Freshness page.
Outside 0DTE hours, or when a symbol has no same-day expiry to show, that panel reads No 0DTE data. It's an empty state, not an error — the ladder returns when the next 0DTE session's data is available.
Common questions
- What does a big positive badge actually mean?
- It means that wall's gamma grew fast over the interval you picked — the level is strengthening. A +34% badge over 5m means the wall grew by about a third in five minutes. A strengthening wall is firming up as a level; a decaying one is losing its grip. It's structure, not a signal — read it alongside the King node and spot.
- Why did a wall show FLIP instead of a percent?
- Because the level changed sign during your interval — its gamma crossed from positive to negative or back. A percent change would be misleading across a sign flip, so the badge just says FLIP. Treat the prior read on that strike as stale and re-evaluate it fresh.
- My badges disappeared. What happened?
- You're most likely in VEX mode — momentum is computed on GEX only, so the badges hide and the toolbar shows momentum = GEX only. Switch the metric back to GEX. If badges are also missing in GEX mode, the moves may simply be too small to badge, or the panel may be STALE.
- Why do only some strikes have badges?
- By design. Tiny moves and noise strikes stay blank so the badges you do see mark the walls that are genuinely shifting. It keeps the ladder readable instead of tagging every row.